Diatonic Harmonica Reeds
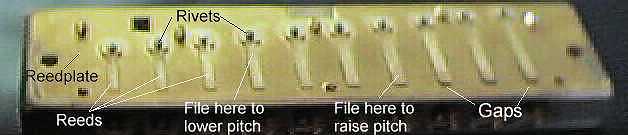
Maintaining your own harps can give you longer lasting harps that play and sound better. Just as guitar players have to change their strings and constantly tune, or sax players have to work with their mouthpiece, harmonica players should be able to set up their instruments to sound good and play well. Maintenance of a harp most often centers around the reeds, as shown in this picture. The rivets attach the reeds to the reed plates, and the reeds vibrate through slots in the reed plates to generate the sound. The action of the reeds depends on the gap between the reed and its slot in the reed plate.
Diatonic Harmonica Reeds
Tuning reeds is done by either removing (normally) or adding (infrequently) metal from/to the reeds. Here's how it works
Before attempting to remove metal from a reed, you need to support the reed so you don't push it through the slot. A thin shim like a .003 spark plug feeler gauge works well, as does a razor blade. You can even use a business card--anything small and thin will do.
Be careful not to push the reed sideways in its slot, or the reed won't vibrate freely. Also, be careful about filing the reed edges, which can cause burrs that catch on the slot-edges as the reed vibrates through the slot. If you get a burr you can shave it off gently with a razor blade, or carefully file it off. Support the other side of the reed so you don't get it misaligned when you apply pressure to the reed's edge with the blade or file.
You need to use a chromatic tuner to check the pitch of the note. You may notice small pitch differences between a note played with the cover off and when the cover is in place. As you get experience doing it you'll be able to judge how to read your tuner and end up with the right note. A popular tuner for harp is the Seiko Chromatic AutoTuner model ST-1000. There are lots of others, both more and less expensive, and even software tuners that use a microphone plugged into your sound card. Many small digital tuners have a mic input, which provides a better signal to the tuner and can help stabilize a "dancing needle" type problem. If you seldom tune your harps, an inexpensive model is probably just fine, but if you tune a lot it's no good being frustrated by a poor tool. No matter what tuner you use, don't forget to use your ears. Your ears are the final judge as to whether a note is properly in tune... if the tuner says it's perfect but it sounds off to you, you'll probably be happier if you make it sound right to you.
Harmonica reeds often go flat, and sometimes you can tune the reed back up to pitch. However, if the reed has gone flat by a semitone or more, it is probably fractured, and tuning the reed may not work. In fact, it may stress the reed enough to cause it to break--but don't worry, it was broken already.
Many harp players do not tune their harps often enough. With a little practice you'll know just how much metal to remove, and where, and it won't take long at all to get your harp all tuned up.
Caution: be sure to check the tuning with a chromatic tuner first to see what the reference ptich frequency is. Historically, the frequency of an A note is used as the reference frequency, but not everywhere uses the same reference! A=440 cycles per second is very common, but harps are often tuned to A=441 or 442 or even higher, because harps are often played slightly flat, so tuning them sharp makes the resultant note fit better with other instruments.
If you tune each note exactly to pitch according to your tuner, the result will be in so-called equal temperament. Equal temperament is common on many models of harps, such as the Lee Oskar Major Diatonic and the Hohner Golden Melody. This tuning is optimized for playing single notes and melodies, but the chords will sound a bit out. To make certain chords sound better, many harps are tuned to a justified (or just) intonation. Just intonation involves modifying the pitch of certain notes to make some chords sound better--but melody notes may sound flat or off key. Various compromised intonations that aren't quite just intonation and aren't equal temperament have been devised to try to work as well as possible for both melody notes and chords.
In addition to keeping your harp in tune, various special tunings can be done to provide different notes (without requiring special bending or overbending techniques) and different chords. Examples include the Natural Minor, country tuning, and Lee Oskar's Melody Maker tuning. Using the above procedures, it is relatively easy to build your own specially tuned harps. Pat Missin's web page contains his "Altered States" document, which contains hundred of different tunings for both the diatonic and chromatic harps.
Just Intonation
Just intonation is a modification to equal temperament that makes chords blend together and sound better. There are many variations to just intonation and an extensive discussion is beyond the scope of these pages. For an extensive discussion of tunings and temperaments, see Pat Missin's web page at: http://www.users.globalnet.co.uk/~patm.
The following table shows one tuning alteration that produces a just intonation. The values are cents deviations from equal temperament (the raw readings of your chromatic tuner) where negative values mean cents flat and positive values mean cents sharp.
| Scale Degree | Root | Third | Fifth | flat Seven | Ninth |
| Cents Adjustment |
|
|
|
|
|
Notice how much flatter the dominant (flat) 7 (5 draw) note isalmost half a semitone. Thats pretty flat and can sound off when playing melodies instead of chords. There are lots of ways to compromise between pure equal temperament and just intonation. The idea is to achieve a compromise tuning that sounds good for melodies without rough sounding chords, or analogously, sounds good for chords without melody notes sounding out of tune. Heres one such compromise:
| Scale Degree | Root | Third | Fifth | flat Seven | Ninth |
| Cents Adjustment |
|
|
|
|
|
For the draw reeds, the thirds are 3 and 7, the fifths are 4 and 8, the flat 7ths are 5 and 9, and the ninths are 6 and 10. (The root notes have no adjustments.)
A reed gap is the gap between the reed and the slot in the reed plate (see the picture above). The gap height (and shape, or profile) greatly influences how the reed plays: how the harp responds to your breath. A wider gap requires more playing pressure to make the reed sound, and allows more aggressive play before the reed sticks or chokes. If you attack notes hard, a relatively wide gap can help keep the reed from missing or refusing to sound. A narrower gap allows less air to activate the reed. If you play softly, a relatively small gap will help the reed activate with a soft attack. If the gap is too small, for instance with the reed tip inside the slot, the reed will refuse to play. Since the reed gaps are so important to the harp action, each player should learn to set the gaps for his/her own style of play.
The reed gaps need to be wider for longer reeds than shorter ones for consistent action. In other words, the low notes should have slightly more gap between the reed and the reed plate than the high notes. In order for the harmonica to play smoothly and uniformly, the response must be consistent for every reed, with the slight gap differences applied for different length reeds. The nominal adjustment is for the gap of the reed tip above the slot to be about the same as the thickness of the reed. Fine tune the gap adjustments from there.
The reed's gap is really the totality of it's distance above the slot along its entire length. This is the area that lets the air flow under the reed and start its vibration. Every bit of the reed should be above the slot in the reed plate, and the distance between the reed and the slot (the gap) should continually increase from the base of the reed to the tip. If any of the reed dips into the slot, or if the reed arches up and then back down it will not respond properly. If the shape of a reed is wrong, correcting the problem is more difficult and requires more care than the normal setting of the height of the reed tip. You can use small tools to support the reed at different points and work through the slot when necessary to gently bend the reed to make it as flat as you can. The best shape for the reed is probably as flat as you can get it, though some players prefer a very slight arc up toward the tip. You should be pretty well practiced at gapping your reeds at the tip before you try to work on the reed shape--and as always, it's a good idea to practice on junk harps. Never throw out a broken harmonica.. they're great for practicing gapping and tuning, and they can be used to provide parts you need to fix other harps later.
Harmonica reeds are essentially just brass springs that vibrate through slots in the reed plates to chop the air stream, which produces the sound. To adjust the reed gaps, just use your fingernails or a small tool to gently press the reed down, to close the gap, or up to increase the gap. After an adjustment is made, flick the tip of the reed a few times to get the reed to settle to its rest position--if you don't you can get fooled by the reed position. It can look one way, but revert back to where it was after you play a little--remember, it's a spring. Flicking the reed tip a few times is a good way to get the reed to settle so you can correctly determine its gap. It's best to bend the reed in very small increments, and not make over adjustments. Slight over adjustments are inevitable, but repeated bending one way, then the other, will weaken the reed and could even cause it to break. The more you do it the more familiar you will become with the characteristics of the brass, and the easier it will be to set the gaps quickly.
By the way, when you go to increase the gap you may want to slide something thin under the reed tip to get hold of the reed. Be careful not to slide anything too far back toward the rivet. If you lift the base of the reed out of the slot you'll probably end up making the reed pitch flat. It is always a good idea to make sure your harps are in tune, and after gapping is a good time to check since you've got the harp open anyway.
Gapping is easy, safe, and a basic requirement for making a harp play well. Factory reeds are set to some average beginner gap, and are usually too wide--and most often inconsistent across the harp. I strongly recommend re-gapping your harps according to your personal playing style and needs.
For overblows, the reeds should be gapped close to the reed plate, i.e. with a small or tight gap. This can be crucial for getting the overblow to sound! An improperly gapped reed will simply refuse to overblow, or at the very least make the overblow difficult and temperamental. I recommend setting the gap as tight as possible without causing the reed to feel "sticky" (slow to respond) when attacked moderately hard. There is a trade-off between overblow ease and reed action for fast loud play, and you need to find the gap that works best for you. There is no visible difference between a gap that seems perfect and one that just doesn't quite work, so you pretty much have to experiment--gap and try, gap and try.
Misaligned Reeds
Misaligned reeds are not straight along the length of their slot, causing part of the reed to catch on the slot, preventing the reed from vibrating properly. You need to get the reed centered in its slot along its entire length, and there is very little clearance. Trying to use a tool to torque the reed back into place can be tricky since the tolerances are so tight, and sideways twisting can easily damage the reed. A small piece of cigarette paper (or a feeler guage about the same thickness) can be slid between the side of the reed and the edge of the slot to gently nudge the reed back into place. I feel that a very thin piece of paper like that is more likely to break than the reed if something goes wrong, so its less risky than using a tool. You can hold the reed plate up to a light to try to peek at the location of the misalignment.
On harmonicas, "valves" are flaps attached to the reed plate at the rivet over the slot opposite the reed. See the picture above. They are made out of a thin plastic strip, or pair of strips, though they used to be made of other materials such as leather.
Valves are most often found on chromatic harmonicas, on which they are usually called windsavers. They do indeed function as valves, blocking the air stream during a draw from entering through the blow reeds (and vice versa for draw reeds) while allowing the air stream during a blow to exit via the blow-reed slot (again vice versa for draw reeds). And since they block the air stream from the opposite reed, less air is required overall to play a reed--thus they save wind, which is important on most chromatics because their mouthpieces and slide assemblies typically leak substantial amounts of air. Windsavers on chromatic are normally present for every reed, sometimes with the exception of the very highest notes.
Such is not the case on diatonics, which are generally much more air tight than their chromatic cousins. The valves on diatonics are not used as windsavers. They are used to facilitate valved bends.
A valved-bend is simply a bend on a reed whose paired-reed (i.e. in the same chamber) is valved. On the diatonic, not all reeds are valved. The valves are used to obtain bends not normally available on the diatonic harp. Normal bends are draw bends on holes 1 through 6, and blow bends on holes 7 through 10. A valved diatonic allows all the regular bends, plus blow bends on holds 1 through 6, and draw bends on holes 7 through 10. So, when valving a diatonic harp, the flaps are placed as follows:
Installation is simply a matter of using super glue to attach the plastic flaps to the reed plate at the rivet point on the other side of the plate from where the reed is attached. Only a tiny amount of super glue should be applied to the valve, and care must be taken not to get glue on the reeds! A small amount of glue should be put on a small slip of paper or plastic, and the end of valve should be dipped into the glue in order to control the amount of glue applied and make sure you dont get too much. If you try to squeeze the glue out of a tube onto the reed plate, you're sure to get too much and have problems!
There are both single layer and double layer valves. Double layer valves have a slightly shorter, stiffer, usually clear plastic "spring" to help keep the actual valve layer flat over the slot. The double-layer valves are installed stiff side up. A good tip is to put a small kink about one third the way back from the tip of the stiff plastic layer so that the tip bends in to push harder on the actual flap layer, holding it down tighter so it lies flatter. Some single layer valves have one side textured and one side smooth. The textured side goes toward the reed plate to help keep the valve from sticking to the plate. If there a dimple in one end of the valve, that sits over the rivet to help put the valve as close to the reed plate as possible.
You can buy valves from Hohner, Bill Romel, John Infande, and probably other harp customizers, or you can make your own. In some sense, valves have not been perfected, and they frequently can rattle or buzz. One of the best materials to use for valving is a thin (0.003) mylar covered with 3M Micropore tape. The tape side goes down, toward the plate, which helps reduce sticking, popping, buzzing, etc. The valves should be trimmed to just barely cover the slot they're on top of.
Take care when reassembling the harmonica that the comb does not interfere with the free operation of the valves. If the comb keeps the valve from lifting during play, the reed won't sound, or won't sound right.
Valved bends are a little different than normal diatonic bends. During a normal bend, both reeds in the chamber can participate to produce the characteristic gutsy sound. These dual-reed bends tend to "snap" into place at the lowest note available. Valved bends are more delicate and require more control to execute cleanly and clearly on pitch. Only one reed participates in the generation of the sound, since the other reed is blocked by the valve. It is especially important not to attack the bend hard when you initiate it, otherwise it will choke off and not sound. It is also very important to bend "from your diaphragm" using resonance for valved bends. A pinching of the lips will not produce a good valved bend. Valved bends can be done on the chromatic, as well as a valved diatonic.
The only commercially available valved diatonic at this time is the valved Suzuki ProMaster (or the semi-chromatic Hohner Slide Harp). But, with a little practice valving your own harp will only take 5 or 10 minutes.
Valve Problems
Valve can stick, buzz, rattle, and generally be a nuisance. Cleaning harps with valves takes extra care to avoid knocking off the flaps. Many valve problems are caused by twisted, curled, or bent flaps that dont lie flat. Many times replacing the valve is the only way to fix a problem. Be careful when you install new valves that any textured side is toward the reed plate, and that the flap is as flat as possible. If it is a 2-layer valve, the stiff plastic goes on top to act as a spring to return the softer flap so it lies flat over the slot.
If the valve is sticking (possibly making a popping sound) there are a couple of things to try. First, tear a small piece of newspaper, moisten it, and slide it between the valve and the reed plate. Sometimes dried saliva is causing the flap to stick, and the wet rough paper can dissolve the "glue" and clean the flap without pulling it off. It sometimes seems to help to make small scratches in the reed plate where the valve hits it to break up the smooth surface to help prevent sticking due to "suction" (surface tension).
Since many sticking problems are due to moisture condensation of your warm breath on the cool harp, it greatly helps to warm up the harmonica before you play it. There are many ways to do that, including wrapping your harp in a warm heating pad for 10 or 15 minutes before you play, or even setting the harp on a warm stereo or TV monitor for a few minutes.
Harp Setup for Chromatic Play Using Valves And Overblows
Overblows and overdraws (overbends) work by choking the reed that normally plays for the airflow direction (blow or draw) and activating the other reed to play as an opening reed. For overblows, this means the blow reed is choked so as not to sound, and the draw reed is activated to produce the sound. Using overblows and overdraws it is possible to get full chromatic capability out of a diatonic harp, just as with valved bends.
Valves interfere with overbends. For example, if a draw reed has been valved, an overblow is not possible in that chamber because the airflow cannot reach the draw reed during a blow. The bottom line is that you can't play valved bends and overbends in the same chamber.
Valving the draw reeds in holes 1, 2, 3, and the blow reed in hole 8, is the optimal way to valve a harp while still allowing full chromatic play without losing the most useful overblows.
Storage
Your harps should be stored so that they dry out thoroughly after being played. It is a good idea to tap the harp on the palm of your hand first, to get out as much moisture as you can before putting the harp away. Don't store your harps in unvented plastic boxes, which unfortunately some of them come in. This keeps them from drying out quickly and can lead to corrosion and reed fatigue. If you store them with the holes down the moisture will be able to run down out of the harp instead of drying inside it. Dried saliva is the primary culprit in gunked-up harps, and can keep the harp from playing right and sounding its best.
Occasionally it is a good idea to clean your harps since gunk (the official name..) builds up inside the holes and on the reeds and reed plates. Saliva is sticky stuff, but fortunately it's water based and so is best dissolved in water. You don't need to use alcohol or harsh chemicals to clean your harp, and you certainly shouldn't use anything you wouldn't want anywhere near your mouth--just use water to clean your harps.
I don't think how you clean your harp is particularly critical, or recommend any specific period of time between cleanings. Each person's playing habits, body chemistry, and tolerance for gunk is different. Obviously, if something is interfering with the way the harp plays you need to take care of it. If that means some fuzz is lodged in there causing a reed not to respond you need to remove the foreign material. If you use a brush, make sure to stroke in the direction of the reeds so you don't cause them to be misaligned by pushing them sideways (not along the slot length). An electric-shaver type brush works well for brushing out the dried gunk from inside the harp holes, but even a toothpick can be used pluck out any offending material.
Caution: wood comb harps (mainly the Hohner Marine Band) are not good to get wet, certainly not for very long. Some people swear by soaking their wood comb harps , and others swear at it--bottom line, the comb will swell and dry out, and upon drying be more inclined to crack, split, or warp. The swelling sometimes will push the comb teeth out beyond the mouthpiece making it very uncomfortable to play. A swollen comb probably eliminates some air leaks, but once soaked you pretty much have to soak it every time or it won't be playable, and the life of the harp is greatly reduced. I recommend against soaking wood comb harps.
Soaking plastic or metal comb harps presents no such problems, since neither the plastic nor metal absorb moisture, swell, or shrink. Prolonged or very frequent soaking can increase corrosion on the reeds and may reduce their overall life, but periodic cleanings shouldn't cause problems. Some people report good success putting their harps (not wood!) in a dishwasher for a short time, say 5 minutes or so, using only a small amount of dishwasher detergent (like a tablespoon). I've found that a quick soak in some denture cleaning solution does a pretty good job. Be sure to shake the excess water out of harp when you're done.
Sharp Edges
Some harps have reed plates that extend slightly beyond the comb and covers, and sometimes these plates have sharp edges that bother people's lips. The outside parts of the harp are not that delicate.. if there's a sharp edge, file it smooth or sand it with fine grained emery type wet/dry paper. If a corner feels too sharp or rough you can safely sand it down or round it out by pressing it firmly onto a hard surface.